Many people ask us how we adventure single-use plastic free, or just how we minimise waste in the outdoors in general! The reason why we travel into the wilderness is to experience the beautiful world which we live in. We don’t want to be out there and contribute to one of the things that is destroying it! Also, how awesome is it not having to carry out waste!
We have broken our tips down into a few different categories…
1. Borrowing, renting or re-purposing second hand camping gear, and buying good quality equipment
2. How to prepare, transport and store food without single use plastics
3. Bathroom supplies – homemade and single use plastic free
1. Borrowing, renting or re-purposing second hand camping gear, and buying good quality equipment
Camping gear, often more times than not, has synthetic material in it. When shopping for our trip, first of all we asked ourselves if we really needed the gear. If the answer was yes, then we looked into the options of borrowing it from friends (a mate lent us his two radios, for example!). The next option was looking into renting it. In Canada, there is an awesome website called Quupe, where you can rent out gear for periods of time. Sometimes it comes to a way cheaper deal than buying it in the first place! We used this to rent out some dehydrators for our food prep. Make sure to check out similar websites in your area, including Tool Libraries, which are found worldwide. The third option was buying it second-hand. We found warm clothes in op-shops (thrift stores), as well as bottles to pee in from our kayaks, and a food thermos! If you do have to buy it new, try and find options not wrapped in plastic, like Ice-breaker merino for thermal clothing. And if you can’t avoid that, then buy good quality things that will last a lifetime and are not condemned for the bin within a few months!


2. How to prepare, transport and store food without single use plastics
It’s crazy to think that a few years ago we would not think twice about putting each individual meal in a zip-lock or vacuumed sealed plastic bag, before putting it in our dry bags. In fact, we often ate pre-packaged freeze dried food, which not only used a lot of packaging, but also did not have the nutrients we needed for the activities we were doing. Our case is a bit different here, as we were sponsored by the incredible Lupii Cafe. They are a waste free cafe in Vancouver who buy food that would otherwise go into the bin, and give it out to those in need for free! They do so much more, so be sure to check out their website. When we reached out to us, they not only offered to supply us with the fresh food, but also cook it and start dehydrating the meals before we flew over. We have been very lucky in this case, especially when we needed to prepare 500 meals for a 3 month trip! But there is no reason why it can’t be repeated, with dedication! Here is a video for when we trialled it initially…
http:www.youtube.com/watch?v=92YQzjVGMJw&t=13s
Here are the steps:
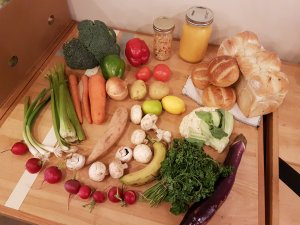
a) Buy food single-use plastic free – fruits, vegetables, bulk food stores for nuts etc. Buy food that is nutritious and will give you lots of energy! Take your own shopping bags and mesh-produce bags (see our Templates and Recipes page for more info on how to make your own!) We will be uploading recipes when we’re back from our trip, so be sure to stay in the loop.
b) Cook the food into delicious recipes that you love!

c) Dehydrate, dehydrate, dehydrate. There are some incredible resources out there on the internet, with recipes, dehydrating times and what works/what doesn’t.

d) Find some newspaper (we got ours from the news-agency) to wrap your food in. If you’re concerned about the ink in your food, like us, you can wrap the first layer in parchment paper, or butchers paper (try not to buy it new though, there is always someone with that roll that has been sitting in the cupboard for years!). Wrap each meal (in our case for 2 people) in 3 layers of newspaper. This keeps moisture out and makes nice little packages for easy sorting.


e) Label the food parcels. Sounds obvious, but this wouldn’t be a fun realisation to have at the end…

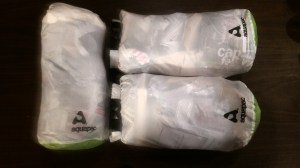
f) We put 2 to three days worth of food into an 8L Aquapac lightweight dry bag. This meant that if moisture did get inside the bags, it was only a few days away and it wouldn’t really matter. The light weight dry bags then went into 15L or 25L Aquapac heavy duty dry bags. We also went to camping stores and asked for their leftover silica gel packs to throw them in, as an extra precaution. Most stores have a whole pile of them out the back!
So far we have trialled this in the tropics of Far North Queensland, Australia, as well as the very rainy Glacier Bay in Alaska. Both of these places have very high humidity and high rainfall, and it has been an absolute success! A great side effect is that the newspaper can be used to dry gear (like boots that accidentally get caught in the rain), as emergency toilet paper, or to help light campfires. It is light and easily compacted into a small size to pack out
3. Bathroom supplies – homemade and single use plastic free
We make our own toothpaste and moisturiser. Check out our Templates and Recipes page for more info on how to make your own versions of all of these. If you wear deodorant in the wild, then we also have a recipe for that!

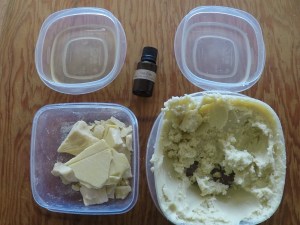
We went to The Soap Dispensary, a bulk food store, to find all of our ingredients for the recipes, as well as natural, package free soap (for our hands and dish-washing), and toilet paper wrapped in recycled paper.
We also have bamboo toothbrushes, and Diva cups, because tampons and pads suck for so many reasons, especially out on an adventure.


We will have more info to add to this when we get back from our trip, everything is a bit rushed at the moment as we are on the road! Feel free to ask us any questions through the contact form on our website, or a comment on this page, and we’ll try to get back to you ASAP!
Videos and more photos to come 😀
